D4D - Exposing the deployment as NodePort and with AWS Load Balancer Controller + Certificate
Introduction
Until now, we have seen how to expose a Kubernetes deployment in different ways:
- Uniquely as NodePort
- As LoadBalancer
Setting up a Deployment as NodePort is very straightforward and can be done easily, but the results are far from being production-ready, as the deployment is reachable through a port assigned by the Kubernetes service rather than the standard ones (80 or 443).
Deploying the application as a LoadBalancer Kubernetes Deployment addresses some of these limitations, allowing us to access our application through ports 80 or 443. Unfortunately, this is not a perfect solution either. With this approach, although we can connect Kubernetes with our cloud provider (AWS, in our case), the AWS Cloud Controller Manager (CCM) can only provision an AWS Classic Load Balancer. This is an older and deprecated version of AWS Load Balancers, which requires us to configure the 403 access and related certificates in a very manual way.
To solve this problem, the solution is to choose a more complex but state-of-the-art approach using the AWS Load Balancer Controller.
Architecture Introduction
We will need a new component to integrate into our Kubernetes tooling: the AWS Load Balancer Controller.
This controller allows us to manage advanced AWS Load Balancers, specifically the Application Load Balancer, which is the next generation that we want to use in our case.
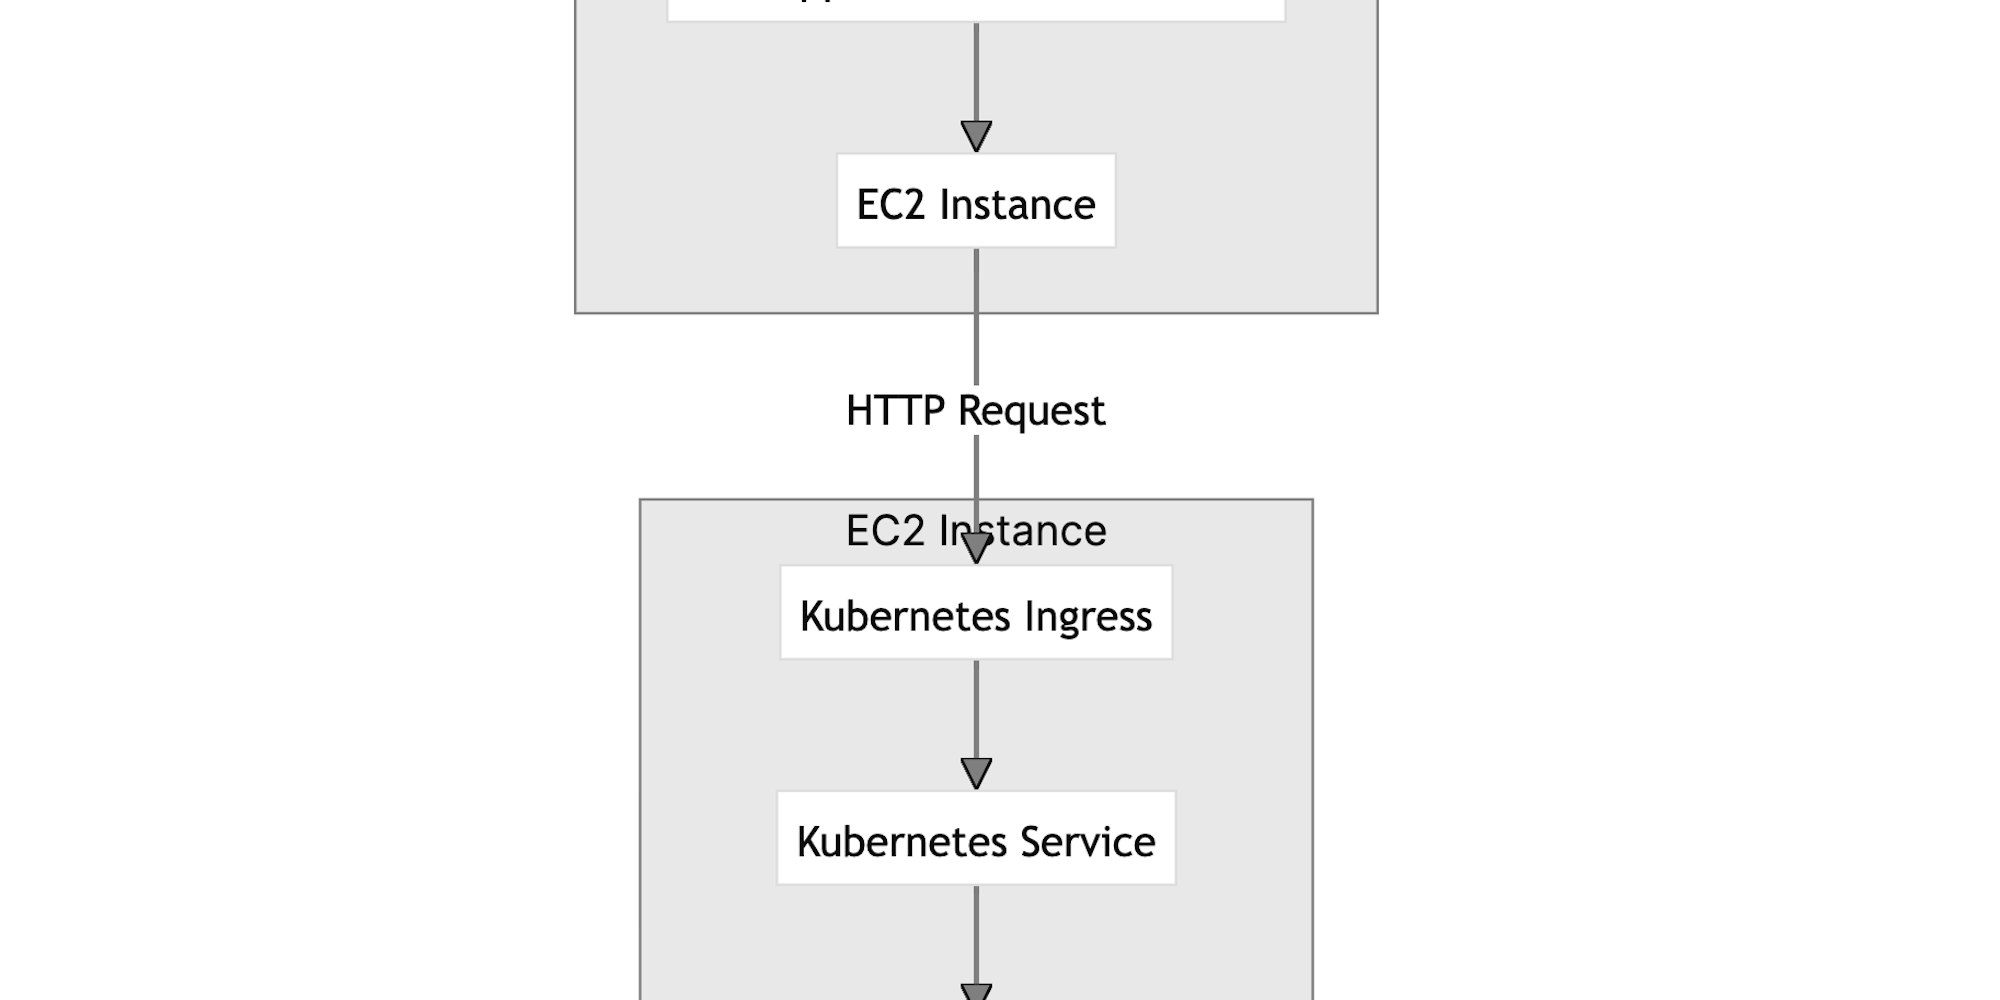
With this in place, our request journey (for HTTP requests on ports 80 or 443) will be represented in the following graph:
As you can see, we have also added an Ingress. This provides us with a lot of flexibility in the future for redirecting traffic based on routes to different services.
With this introduction, the steps we need to follow to deploy in this manner are:
- Install and configure the AWS Load Balancer Controller.
- Apply a Service. It is a standard Service, with no differences.
- Apply an Ingress to route the traffic.
- Install and configure a certificate (for enabling HTTPS).
We assume we already have a deployment running and the AWS Cloud Controller Manager (CCM) installed. Check [[D4D - Exposing the Deployment as a LoadBalancer]] for more information.
Install the AWS Load Balancer Controller
To install AWS Load Balancer in your K8S Cluster follow this guide
Create / Apply the Service
Let's create a contrived service and apply it. As you can see, we will create it as a ClusterIP service, which will expose port 80. The Ingress will redirect the traffic to this service, acting as a middleman.
apiVersion: v1
kind: Service
metadata:
  name: hello-world-alb
spec:
  type: NodeType
  selector:
    app: hello-world-lb
  ports:
    - name: http
      protocol: TCP
      port: 80
      targetPort: 8080
and apply it kubectl apply -f <your_file>
Apply Ingress
And now a contrived ingress that describes the creation of a ALB and points to the hello-world-service.
apiVersion: networking.k8s.io/v1
kind: Ingress
metadata:
  name: hello-world-ingress
  namespace: default
  annotations:
    alb.ingress.kubernetes.io/scheme: internet-facing  # Makes the ALB public
    alb.ingress.kubernetes.io/listen-ports: '[{"HTTP":80}, {"HTTPS":443}]'  # Listens on port 80, and 443
    alb.ingress.kubernetes.io/target-type: instance  # Target type instance
    alb.ingress.kubernetes.io/security-groups: "sg-0c04958ffd31944da"
spec:
  ingressClassName: "alb"  # Specifies the ingress controller
  rules:
    - host: oman.meerkating.solutions  # Your domain name
      http:
        paths:
          - path: /
            pathType: Prefix
            backend:
              service:
                name: hello-world-service  # Your service name
                port:
                  number: 80
    - http:  # No host specified allows access via ALB DNS
        paths:
          - path: /
            pathType: Prefix
            backend:
              service:
                name: hello-world-service  # Your service name
                port:
                  number: 80
and apply it so kubectl apply -f <your_file>
Link the automatically created ALB to the instance
After you create the Ingress, an Application Load Balancer (ALB) will be automatically provisioned.
You need to link the EC2 instance to the Load Balancer so it knows where to forward the requests.
To do this, you need to perform the following steps:
Create a target group (which groups the targets).
Attach your instance to the target group.
Create a listener.
Attach the target group to the listener.
Create a target group
```bash
aws elbv2 create-target-group --name kubenertes-target-group \
  --protocol HTTP --port <port_where_the_k8s_service_is_listening> \
  --vpc-id vpc-0fc610e648a8bcb9f \
  --target-type instance
Attach your instance to the target group
aws elbv2 register-targets --target-group-arn <target-group-arn> \ --targets Id=<instance-id>Create a rule to forward
what the listener listens (by port 80), is redirect to the target group.
aws elbv2 create-rule --listener-arn <listener-arn> --priority 10 --conditions Field=path-pattern,Values='/*' --actions Type=forward,TargetGroupArn=<target-group-arn>Useful commands
# check the listeners
aws elbv2 describe-listeners --load-balancer-arn <alb-arn>

# check the load balancer
aws elbv2 describe-load-balancers --names <load-balancer-name>
Install certificate & activate HTTPS
aws acm request-certificate \ --domain-name <domain> \ --validation-method DNS \ --region <regionYou have to validate your domain by setting a CNAME:
Check how to do it and the status here
aws acm describe-certificate \ --certificate-arn <certificate_arn> \ --region eu-west-3important, most probably you need also to add the CCA authorities in your DNSs: check this link: https://docs.aws.amazon.com/acm/latest/userguide/setup.html#setup-caa
Create a new Listener
In our descriptor file of the ingress we already declared the 443 port but this is just in case.
If you have already port 443 as listener in your load balancer, you can forget this point.
aws elbv2 create-listener \
  --load-balancer-arn <load_balance_arn>
  --protocol HTTPS \ --port 443 \
  --certificates CertificateArn=<certificate_arn> \
  --default-actions Type=forward,TargetGroupArn=<your-target-group-arn> \
  --region <your_region>
```bash
aws ec2 authorize-security-group-ingress \
--group-id sg-0901545af27ae3060 \
--protocol tcp \
--port 443 \
--cidr 0.0.0.0/0Configure the redirection of the port 80 (the listener port 80)
aws elbv2 modify-listener \ --listener-arn <http-listener-arn> \ --default-actions '[{"Type": "redirect", "RedirectConfig": {"Protocol": "HTTPS", "Port": "443", "StatusCode": "HTTP_301"}}]' \ --region eu-west-3Outro
This is it! Now we have a state-of-the-art Kubernetes cluster in our AWS EC2 instance, self-managed and ready to be used for deploying our applications in a CI/CD manner.
I hope you enjoyed it. Thank you!


